
To be able to reach your home server from the Internet, you will first need your own domain name for it. I will show the setup using my own setup with dynv6 and Ionos, but it can be achieved similarly using other providers.
In case you have a fixed IP address, it is simple. You will just need to link it to a domain name. For that, you will need to pick a provider for domain names and configure your IP address in the A (for IPv4) and AAAA records (for IPv6) of your domain. Then you can skip the following part and continue with setting up port forwarding.
Static Name for a Dynamic Address
In most cases, however, you will be assigned a dynamic IP address by your Internet provider. In that case, you will have to use a DynDNS provider (short for Dynamic Domain Name System) like dynv6. If you configure a domain there and inform it frequently about your current IP address, it will update the A and AAAA records to this IP address regularly.
With dynv6 you first create a domain. This can be a domain name with dynv6 itself (the domain name would then be e.g. me.dynv6.net) or a domain name you already own.
Existing Domain
In my case, the latter applied. I already owned a domain at Ionos and decided to make my home server accessible through “home.<mydomain>”. To achieve this, you will need to modify the usage type of your subdomain so that it uses a configured name server (sorry, the screenshot is in German).
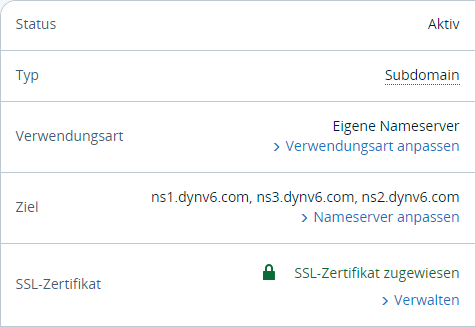
Then you configure the name server for the subdomain by first removing any already existing records and instead adding three NS records for dynv6’s name servers (ns1.dynv6.com, ns2.dynv6.com, and ns3.dynv6.com). It will look like this in the end:

If you afterward call the subdomain, the call will be routed to the name servers of dynv6, which in turn will use your IP address to access the home server.
General Configuration
In dynv6 select “single zone” as type. dynv6 will then create a zone in addition to the domain, which you will now need to configure. Otherwise, you won’t be able to easily route all subdomains of your domain to your home server (which we want to do eventually). For that, select the zone and adjust the entries on the “Records” tab:
- First, remove all existing entries.
- Add an entry of type “A”. For “Name” enter
*.<domain>and leave “Data” empty. - Add another entry of type “AAAA”. As “Name” enter
<domain>and for “Data” the host part of the IPv6 address, i.e. the IPv6 ID of your home server. In a Fritzbox you will find it when clicking on your home server under “Home Network–Network”. It is listed under “IPv6 Interface ID”. After you entered it, you will actually see the full address in the table (i.e. eight blocks with four hex digits each, not just four blocks). Don’t worry! When you click on “Edit”, you will still just see the interface ID.
The final result will look like this in the table:
| Type | Name | Data | |
|---|---|---|---|
| A | *.<domain> | not set <IPv4 address> | edit delete |
| AAAA | <domain> | <IPv6 address> | edit delete |
Now, all that is missing is the final step. Under “Instructions” you will learn how to update the IP address regularly. This is quite simple in a Fritzbox because it has a setting for it. However, the instructions for IPv6 are not correct, because you will get the IPv6 address of your Fritzbox, not of your home server. The configuration must be modified like this:
http://dynv6.com/api/update?hostname=<domain>&token=<username>&ipv4=<ipaddr> http://dynv6.com/api/update?hostname=<domain>&token=<username>&ipv6=::homeserver-id&ipv6prefix=<ip6lanprefix>You will have to replace homeserver-id with the IPv6 ID of your home server as configured in the AAAA record, e.g. ::1234:567:890:abcd.
If you do not own a Fritzbox or any other router capable of managing the DynDNS updates, the “worst case” would be for you to run a script to handle this. You can find one here.
If everything is set up properly, entering http://<domain> should open your router’s page. However, updating A and AAAA records might take a few minutes.
Port Forwarding
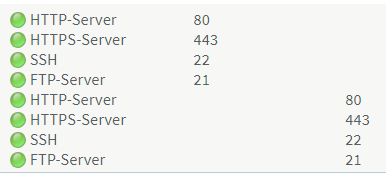
To allow access to your home server via HTTP and HTTPS from the Internet, you will now need to configure port forwarding for it in your router. HTTP uses port 80 and HTTPS port 443. Theoretically, you can use other ports and configure the home server accordingly, but then you will always have to enter the port numbers in your browser. And it won’t really be safer, because a simple port scan will show what ports you actually use. So, it is just a wasted effort.
During the setup of your home server, you might also want to forward ports 21 (FTP) and 22 (SSH) in case you want to make changes from remote. Later, you can remove these forwards again to make it harder for attackers.
Here is a screenshot from my Fritzbox for port forwarding for IPv4 (left) and IPv6 (right):
Theoretically, you can even drop port 80 to only allow access through the safer HTTPS. But since I’m lazy and want to rather enter app.home.meinedomaene in my browser and not https://app.home.meinedomaene, I solved this differently. The Reverse Proxy (we will get to that later) re-routes all HTTP requests to HTTPS in the browser. That way, I achieve the same but keep the convenience in the browser.
Wenn Sie diese Felder durch einen Klick aktivieren, werden Informationen an Facebook, Twitter, Flattr, Xing, t3n, LinkedIn, Pinterest oder Google eventuell ins Ausland übertragen und unter Umständen auch dort gespeichert. Näheres erfahren Sie durch einen Klick auf das i.