Extend Default Ubuntu LVM Partition

Another digression at this point, because this took me quite some time to figure out.

After I installed Ubuntu as described earlier, everything seemed to work fine, until I realized that the main drive (mapped to ‘/’ in Ubuntu) was running out of space. Given that I use a 512GB drive, I was a bit shocked.

First, I searched for the largest folders on the drive, to find the culprit. The best tool to support you here is the nCurses Disk Usage tool. You can install it as follows:

sudo apt-get install ncdu

Afterwards, you can run it like this for the root folder:

sudo ncdu /

You will end up with a screen like that (with your folders sorted by size):

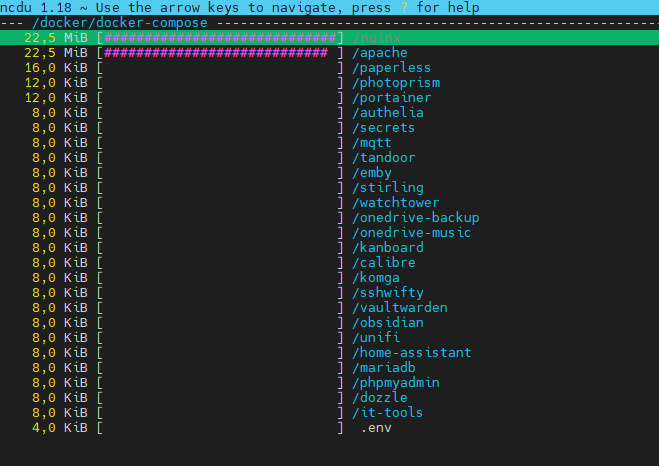
Even so, this was very helpful, I did not find any folder that was really exceedingly large. So, what next? After running df -h to again check the size of the drives, I realized that the line for the root folder looked like this:

/dev/mapper/ubuntu--vg-ubuntu--lv  4,0G   3,6G  0,4G  90% /

So basically, my root folder only had 4GB of space, of which 90% were already used. But why? Again, I had put a 512GB SSD in. Further research, especially searching for the name of the filesystem (ubuntu--vg-ubuntu--lv) revealed the root cause. The LVM partition (logical volume) did not use all the space of the volume group. Ubuntu uses volume groups and logical volumes within them and maps the root folder to it. Read this for more detail, please.

So, first I called sudo vgdisplay to check if there was still free space in the volume group. And sure enough, there were more than 470GB still available (see “Free PE / Size”).

  --- Volume group ---
  VG Name               ubuntu-vg
  System ID
  Format                lvm2
  Metadata Areas        1
  Metadata Sequence No  3
  VG Access             read/write
  VG Status             resizable
  MAX LV                0
  Cur LV                1
  Open LV               1
  Max PV                0
  Cur PV                1
  Act PV                1
  VG Size               <473,89 GiB
  PE Size               4,00 MiB
  Total PE              121315
  Alloc PE / Size       922 / <3,61 GiB
  Free  PE / Size       121315 / <473,89 GiB
  VG UUID               bTkwD5-jadm-RbQB-1Hh1-2P4M-FiYW-EfPLfm

A call to sudo lvdisplay then confirmed, that the logical volume was much smaller:

  --- Logical volume ---
  LV Path                /dev/ubuntu-vg/ubuntu-lv
  LV Name                ubuntu-lv
  VG Name                ubuntu-vg
  LV UUID                W8dT1K-3aK9-rbjS-kO03-R6Os-8c52-jlwS5K
  LV Write Access        read/write
  LV Creation host, time ubuntu-server, 2023-12-04 11:43:11 +0100
  LV Status              available
  # open                 1
  LV Size                <4,0 GiB
  Current LE             922
  Segments               1
  Allocation             inherit
  Read ahead sectors     auto
  - currently set to     256
  Block device           252:0

Now, run  lvextend -l +100%FREE /dev/ubuntu-vg/ubuntu-lv to use up all available space in the volume group. and confirm by calling sudo lvdisplay again:

  --- Logical volume ---
  LV Path                /dev/ubuntu-vg/ubuntu-lv
  LV Name                ubuntu-lv
  VG Name                ubuntu-vg
  LV UUID                W8dT1K-3aK9-rbjS-kO03-R6Os-8c52-jlwS5K
  LV Write Access        read/write
  LV Creation host, time ubuntu-server, 2023-12-04 11:43:11 +0100
  LV Status              available
  # open                 1
  LV Size                <473,89 GiB
  Current LE             121315
  Segments               1
  Allocation             inherit
  Read ahead sectors     auto
  - currently set to     256
  Block device           252:0

And voilá, now my root folder has all the space it needs, as another call to df -h confirmed:

/dev/mapper/ubuntu--vg-ubuntu--lv  466G   94G  353G  21% /

Wenn Sie diese Felder durch einen Klick aktivieren, werden Informationen an Facebook, Twitter, Flattr, Xing, t3n, LinkedIn, Pinterest oder Google eventuell ins Ausland übertragen und unter Umständen auch dort gespeichert. Näheres erfahren Sie durch einen Klick auf das i.

Posted in Home Server | Tagged | Leave a comment

Setting up your own Domain

To be able to reach your home server from the Internet, you will first need your own domain name for it. I will show the setup using my own setup with dynv6 and Ionos, but it can be achieved similarly using other providers.

In case you have a fixed IP address, it is simple. You will just need to link it to a domain name. For that, you will need to pick a provider for domain names and configure your IP address in the A (for IPv4) and AAAA records (for IPv6) of your domain. Then you can skip the following part and continue with setting up port forwarding.

Static Name for a Dynamic Address

In most cases, however, you will be assigned a dynamic IP address by your Internet provider. In that case, you will have to use a DynDNS provider (short for Dynamic Domain Name System) like dynv6. If you configure a domain there and inform it frequently about your current IP address, it will update the A and AAAA records to this IP address regularly.

With dynv6 you first create a domain. This can be a domain name with dynv6 itself (the domain name would then be e.g. me.dynv6.net) or a domain name you already own.

Existing Domain

In my case, the latter applied. I already owned a domain at Ionos and decided to make my home server accessible through “home.<mydomain>”. To achieve this, you will need to modify the usage type of your subdomain so that it uses a configured name server (sorry, the screenshot is in German).

Then you configure the name server for the subdomain by first removing any already existing records and instead adding three NS records for dynv6’s name servers (ns1.dynv6.com, ns2.dynv6.com, and ns3.dynv6.com). It will look like this in the end:

If you afterward call the subdomain, the call will be routed to the name servers of dynv6, which in turn will use your IP address to access the home server.

General Configuration

In dynv6 select “single zone” as type. dynv6 will then create a zone in addition to the domain, which you will now need to configure. Otherwise, you won’t be able to easily route all subdomains of your domain to your home server (which we want to do eventually). For that, select the zone and adjust the entries on the “Records” tab:

  • First, remove all existing entries.
  • Add an entry of type “A”. For “Name” enter *.<domain> and leave “Data” empty.
  • Add another entry of type “AAAA”. As “Name” enter <domain> and for “Data” the host part of the IPv6 address, i.e. the IPv6 ID of your home server. In a Fritzbox you will find it when clicking on your home server under “Home Network–Network”. It is listed under “IPv6 Interface ID”. After you entered it, you will actually see the full address in the table (i.e. eight blocks with four hex digits each, not just four blocks). Don’t worry! When you click on “Edit”, you will still just see the interface ID.

The final result will look like this in the table:

TypeName Data 
A*.<domain>not set <IPv4 address> edit  delete
AAAA<domain><IPv6 address> edit  delete

Now, all that is missing is the final step. Under “Instructions” you will learn how to update the IP address regularly. This is quite simple in a Fritzbox because it has a setting for it. However, the instructions for IPv6 are not correct, because you will get the IPv6 address of your Fritzbox, not of your home server. The configuration must be modified like this:

http://dynv6.com/api/update?hostname=<domain>&token=<username>&ipv4=<ipaddr> http://dynv6.com/api/update?hostname=<domain>&token=<username>&ipv6=::homeserver-id&ipv6prefix=<ip6lanprefix>

You will have to replace homeserver-id with the IPv6 ID of your home server as configured in the AAAA record, e.g. ::1234:567:890:abcd.

If you do not own a Fritzbox or any other router capable of managing the DynDNS updates, the “worst case” would be for you to run a script to handle this. You can find one here.

If everything is set up properly, entering http://<domain> should open your router’s page. However, updating A and AAAA records might take a few minutes.

Port Forwarding

To allow access to your home server via HTTP and HTTPS from the Internet, you will now need to configure port forwarding for it in your router. HTTP uses port 80 and HTTPS port 443. Theoretically, you can use other ports and configure the home server accordingly, but then you will always have to enter the port numbers in your browser. And it won’t really be safer, because a simple port scan will show what ports you actually use. So, it is just a wasted effort.

During the setup of your home server, you might also want to forward ports 21 (FTP) and 22 (SSH) in case you want to make changes from remote. Later, you can remove these forwards again to make it harder for attackers.

Here is a screenshot from my Fritzbox for port forwarding for IPv4 (left) and IPv6 (right):

Theoretically, you can even drop port 80 to only allow access through the safer HTTPS. But since I’m lazy and want to rather enter app.home.meinedomaene in my browser and not https://app.home.meinedomaene, I solved this differently. The Reverse Proxy (we will get to that later) re-routes all HTTP requests to HTTPS in the browser. That way, I achieve the same but keep the convenience in the browser.

Hard Drives     


Wenn Sie diese Felder durch einen Klick aktivieren, werden Informationen an Facebook, Twitter, Flattr, Xing, t3n, LinkedIn, Pinterest oder Google eventuell ins Ausland übertragen und unter Umständen auch dort gespeichert. Näheres erfahren Sie durch einen Klick auf das i.

Posted in Home Server | Tagged | Leave a comment

Get Idle Hard Drives to Sleep

At this point, I would like to digress to a topic that was really annoying and took me a bit to resolve. It’s how to spin down hard drives when they are idle. As mentioned earlier, I bought a 5TB USB-3.0 drive from Western Digital as an external hard drive for additional storage. When connecting it to the PC, it never stopped spinning. Apart from the wear on the drive, this also produces a constant background noise that I wanted to avoid.

Some research showed that under Ubuntu, some hard drives do not automatically go to sleep when idle. However, there is a way to achieve this. And it works perfectly for me. First, you’ll need to check if the drive’s controller supports hdparm. To do so, call

sudo hdparm -C /dev/sdc

If the drive state is reported as e.g. active/idle, it is supported, otherwise not. In my case it reported drive state is: unknown.

No matter, if hdparam is supported or not, you will need to determine the UID of the drive by calling

sudo blkid

Find the UUID for the corresponding drive. E.g.

/dev/sdc1: LABEL="Elements" BLOCK_SIZE="512" UUID="FCD216FAD216B8BA" TYPE="ntfs" PARTLABEL="Elements" PARTUUID="7902be53-dd2a-4613-b580-c89f0525e4fc"

If hdparam is supported by your drive, edit /etc/hdparm.conf and add the following lines at the end (time is defined in 5-second steps, so here it is 60 * 5 seconds, i.e. 5 minutes) to set the delay after which the drive shall go to sleep:

/dev/disk/by-uuid/FCD216FAD216B8BA {
        spindown_time = 60
}

There are some hard drives out there that do report a correct state when calling hdparam, but do not support the spindown time setting. If that is the case with your drive, or if hdparam does not work and the drive state is reported as unknown, try hd-idle. You need to install it by calling

sudo apt install hd-idle

If this does not work, install it manually by first calling

wget https://www.foxplex.com/components/uploads/gDzcGMoX-hd-idle_1.05_amd64.deb

to get the package from here (see section “Einstellung per hd-idle / für harte Fälle”) and then running

sudo dpkg -i gDzcGMoX-hd-idle_1.05_amd64.deb

Adjust the configuration:

sudo nano /etc/default/hd-idle

Modify or add the following lines (time for -i in seconds, here 5 minutes):

START_HD_IDLE=true

HD_IDLE_OPTS="-i 0 -a /dev/disk/by-uuid/FCD216FAD216B8BA -i 300 -l /var/log/hd-idle.log"

Start the service and enable it, so that it gets automatically started at boot time from now on:

sudo systemctl start hd-idle
sudo systemctl enable hd-idle

Now the hard drive will spin down after the configured time.

To manually spin it down immediately, call

sudo hdparm -y /dev/sdc

if hdparam works or otherwise

sudo hd-idle -t sdc

Note:
This page contains affiliate links to Amazon. Feel free to order your hardware anywhere, but it would be nice of you to use these links so that I get a small reward for writing all this information up. 😉

Ubuntu     Own Domain


Wenn Sie diese Felder durch einen Klick aktivieren, werden Informationen an Facebook, Twitter, Flattr, Xing, t3n, LinkedIn, Pinterest oder Google eventuell ins Ausland übertragen und unter Umständen auch dort gespeichert. Näheres erfahren Sie durch einen Klick auf das i.

Posted in Home Server | Tagged , | Leave a comment

Ubuntu Installation

Since www.libe.net has a very good installation guide here (I linked to their screenshots in the steps below) and even a video there, I will just quickly walk through the steps that I followed and that I consider important. Basically, they follow the official Ubuntu installation guide to install Ubuntu from a stick as described here.

When the installation medium is inserted (DVD or USB stick) and the PC is booted, the GRUB bootloader will appear. If not, you might want to consider these steps.

So, we will select the option to install Ubuntu.

GRUB Menu

The installation type is a standard Ubuntu server:

Installation Type

The wizard guides us through the network settings and through setting up the profile:

Network Selection

Basic Setup

I went for mini-pc as the hostname in my setup, but you can use whatever you like (as long as it is supported by Ubuntu). Here, you also define your username and password.

To be able to administer the server in a headless setup over the network, enable the OpenSSH server:

OpenSSH OptionDocker could be easily enabled as a “featured server snap” during server installation, however, do not do so! We will install it via apt later.

Do not forget to set the time zone on the server! First, check the time zone by calling timedatectl. If the time zone is not set correctly, get the correct time zone name (here with Berlin as an example) by calling

timedatectl list-timezones | grep Berlin

The output will be

Europe/Berlin

Now change the time zone by calling

sudo timedatectl set-timezone Europe/Berlin

And you are done! You should now have a working Ubuntu server and we can continue to the next steps.

Hardware     Hard Drives


Wenn Sie diese Felder durch einen Klick aktivieren, werden Informationen an Facebook, Twitter, Flattr, Xing, t3n, LinkedIn, Pinterest oder Google eventuell ins Ausland übertragen und unter Umständen auch dort gespeichert. Näheres erfahren Sie durch einen Klick auf das i.

Posted in Home Server | Tagged , | Leave a comment

Hosting a Server at Home

I will now start a new series of posts on how I set up my server at home. It hosts several applications, is accessible from the web (but only via HTTPS), and solves some problems in a nice way for me.

First of all, I had to figure out, what hardware to use. If you already have a PC lying around, fine. If not, there are several options. My main requirements were that it shall run stable (and to a point perform well) and not use too much power.

I started off with a Raspberry Pi 3+, which I had already, but soon learned that it wouldn’t fulfill the first requirement. I think I burned three SD cards before giving up. There were most likely just too many read/write accesses.

I then did a little research and figured out that a mini PC would best fulfill my requirements. Now, there are lots of them out there and which one to choose mostly depends on what you want to do with it. I decided to go for the NiPoGi AK2 Plus. It was not too expensive and has enough power for what I need. I updated it by adding a second 512GB SSD, which I already owned.

Later I added an external USB HDD as a backup and storage drive for all the data. It is a 5TB USB-3.0 drive from Western Digital. After figuring out how to get the HDD to go to sleep when not actively used, I was very satisfied with this setup.

I usually run the PC headless but can connect it to the HDMI input of one of my monitors when needed. Most likely a TV would also work for these rare cases.

Now that the hardware was there, I could start setting it up. I’ll describe the setup in the sequence I would now consider best, but for sure I experimented a lot and it was not as straightforward when I installed things. 😀

Note:
This page contains affiliate links to Amazon. Feel free to order your hardware anywhere, but it would be nice of you to use these links so that I get a small reward for writing all this information up. 😉

     Ubuntu


Wenn Sie diese Felder durch einen Klick aktivieren, werden Informationen an Facebook, Twitter, Flattr, Xing, t3n, LinkedIn, Pinterest oder Google eventuell ins Ausland übertragen und unter Umständen auch dort gespeichert. Näheres erfahren Sie durch einen Klick auf das i.

Posted in Home Server | Tagged , , | Leave a comment

Architecture Consistency

Always keep your architecture design consistent, i.e. use the same solution for the same problem. If not, your architecture becomes unnecessarily complicated, which can lead to problems, sometimes even catastrophic ones. Here are two examples for such problems: Continue reading


Wenn Sie diese Felder durch einen Klick aktivieren, werden Informationen an Facebook, Twitter, Flattr, Xing, t3n, LinkedIn, Pinterest oder Google eventuell ins Ausland übertragen und unter Umständen auch dort gespeichert. Näheres erfahren Sie durch einen Klick auf das i.

Posted in General, War Stories | Leave a comment

Quality Attributes

Introduction

Today I would like to talk about quality attributes. They are often also called “non-functional requirements”, but I don’t really like that term, because it makes them sound unimportant for the customer. However, they are essential when developing a system. From an architecture perspective they are critical, because the quality attributes are the main input for your architecture decisions. If you consider the wrong attributes, your whole architecture backbone will be wrong, leading to high effort and costs and bad product quality. Eventually your project might even fail.
Continue reading


Wenn Sie diese Felder durch einen Klick aktivieren, werden Informationen an Facebook, Twitter, Flattr, Xing, t3n, LinkedIn, Pinterest oder Google eventuell ins Ausland übertragen und unter Umständen auch dort gespeichert. Näheres erfahren Sie durch einen Klick auf das i.

Posted in Quality Attributes, Testing | 2 Comments

Architecture Refactoring

In software development the term refactoring has been established quite a while ago already in the context of code refactoring. However, there is also the refactoring of the design (i.e. changing the internal structures of subsystems, components, or services), database refactoring (i.e. changing the database structures), and architecture refactoring (i.e. changing structures of the system). In addition there are even organizational refactoring and process refactoring in projects, which don’t focus on the system developed, but rather on changes that will improve the project structure.
Continue reading


Wenn Sie diese Felder durch einen Klick aktivieren, werden Informationen an Facebook, Twitter, Flattr, Xing, t3n, LinkedIn, Pinterest oder Google eventuell ins Ausland übertragen und unter Umständen auch dort gespeichert. Näheres erfahren Sie durch einen Klick auf das i.

Posted in Change, Refactoring | 7 Comments

Nothing Is Permanent Except Change

Architects have the problem that they need to constantly deal with change. Change happens. That’s a fact. πάντα ῥεῖ (panta rhei) as the Greek philosopher Heraklitus supposedly said. So you’ll have to deal with it. How? Well, Michael Stal provided a nice presentation on this topic in 2012. You can find a link to his blog on the references page.


Wenn Sie diese Felder durch einen Klick aktivieren, werden Informationen an Facebook, Twitter, Flattr, Xing, t3n, LinkedIn, Pinterest oder Google eventuell ins Ausland übertragen und unter Umständen auch dort gespeichert. Näheres erfahren Sie durch einen Klick auf das i.

Posted in Change, General | 2 Comments

It’s all about testing…

There can be no proper development without proper validation. So testing is one of the most important tasks during development. And that includes the architecture. Not only must the architect ensure proper testing, (s)he also needs to validate the correct realization of the architecture design. I will get into detail on some of the tasks the architect needs to take care of later. At this point I would just like to point out that test consideration has to start from the beginning of architecture design and must continue all the way throughout development to integration.
Continue reading


Wenn Sie diese Felder durch einen Klick aktivieren, werden Informationen an Facebook, Twitter, Flattr, Xing, t3n, LinkedIn, Pinterest oder Google eventuell ins Ausland übertragen und unter Umständen auch dort gespeichert. Näheres erfahren Sie durch einen Klick auf das i.

Posted in Quality Attributes, Testing | 1 Comment